12 Creative Mickey Mouse Valentine’s Box Ideas for Kids
Mickey Mouse-themed Valentine’s Day boxes are popular choices for kids to collect cards and treats. These creative designs range from simple DIY projects using everyday materials to more elaborate crafts, all featuring the iconic Disney character.
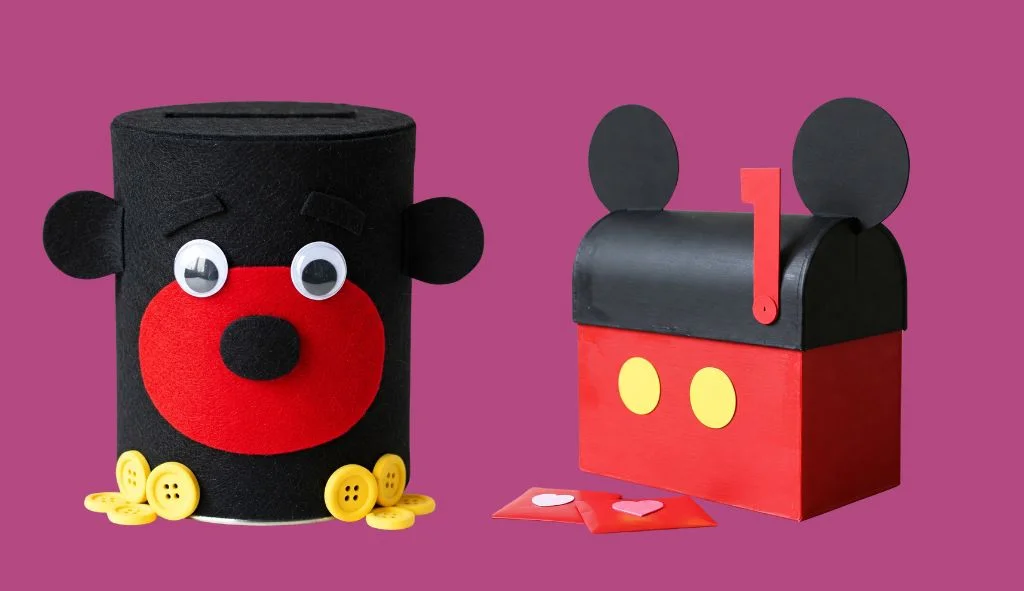
DIY Mickey Mouse Valentine’s Day Mailbox
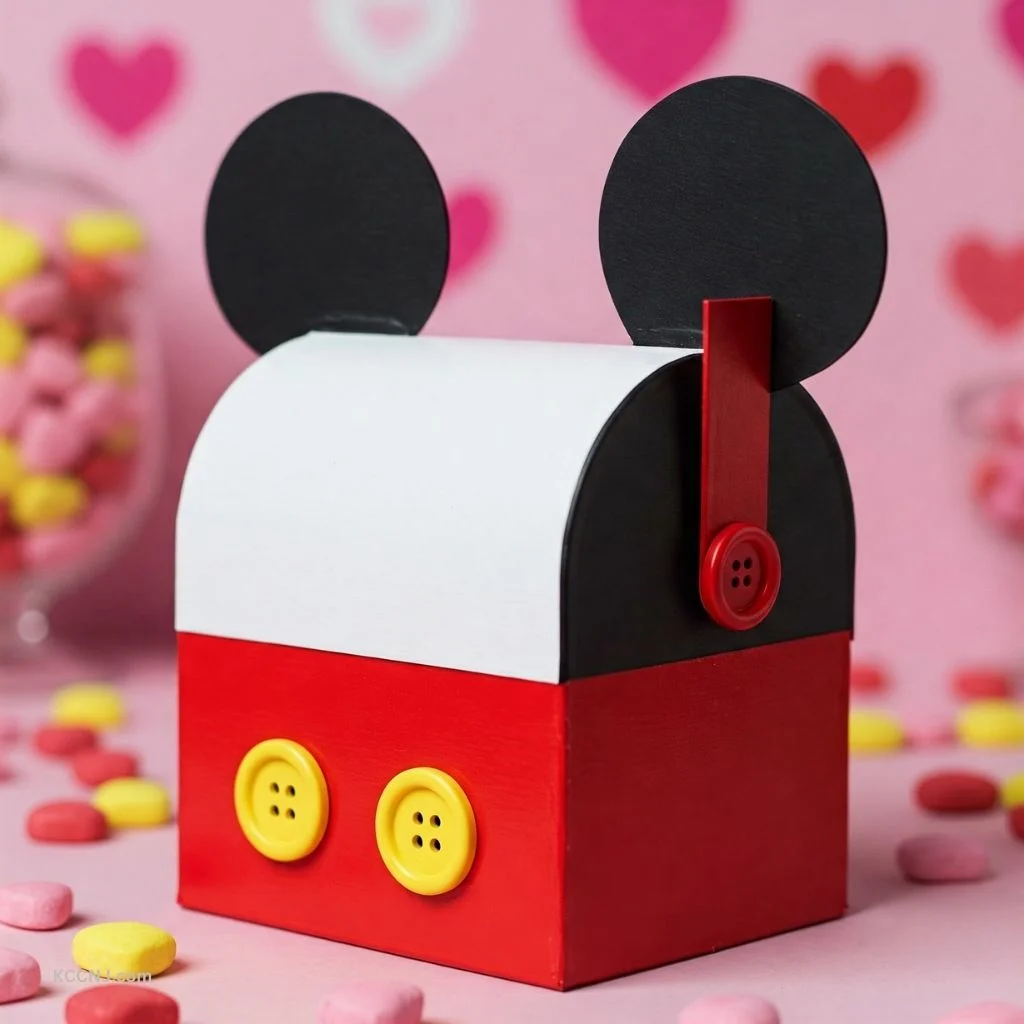
One of the simplest and most effective Mickey Mouse Valentine’s box ideas is the DIY Mickey Mouse Mailbox. This project transforms a basic box into a charming representation of the beloved Disney character.
Materials Needed
To create this Mickey Mouse Valentine’s box, you’ll need:
- A white Valentine card box or a shoebox
- Black and red acrylic paint
- Hot glue gun
- Foam hearts
- Black craft foam
- Scissors
- Paintbrush
Step-by-Step Instructions
- Start with a plain white Valentine card box or a shoebox.
- Paint the bottom half of the box red and the top half black to represent Mickey’s iconic color scheme.
- Allow the paint to dry completely. You may need to apply two coats for even coverage.
- Cut two large circles from black craft foam for Mickey’s ears.
- Attach the ears to the top of the box using a hot glue gun.
- Cut small yellow ovals from craft foam or paper for Mickey’s buttons.
- Glue the yellow ovals to the red portion of the box.
- Optional: Add foam hearts or other Valentine’s Day decorations to personalize the box.
This simple design captures the essence of Mickey Mouse while providing a functional box for collecting Valentine’s Day cards and treats.
Mickey and Minnie Mouse Valentine Card Box
For those who want to include both Mickey and Minnie in their Valentine’s Day celebration, consider creating a dual-character box.
Materials Needed
- Large rectangular box
- Red and black paint or construction paper
- White paper
- Yellow craft foam or paper
- Red polka dot ribbon or paper
- Scissors
- Glue
- Black marker
Creating the Box
- Paint or cover the box with red paper for the base.
- Create a divider in the middle of the box to separate Mickey and Minnie sections.
- Cut large black circles for ears and attach them to the top of each section.
- For Mickey’s side, add two large white circles for eyes and a smaller black circle for the nose.
- For Minnie’s side, do the same but add eyelashes with a black marker and a red polka dot bow between the ears.
- Cut slots on top of each section for inserting cards.
- Add yellow buttons to the front of Mickey’s side.
- Decorate with hearts or other Valentine’s Day motifs as desired.
This dual-character box allows children to sort cards or share the box with a sibling or friend.
Mickey Mouse Clubhouse Themed Box
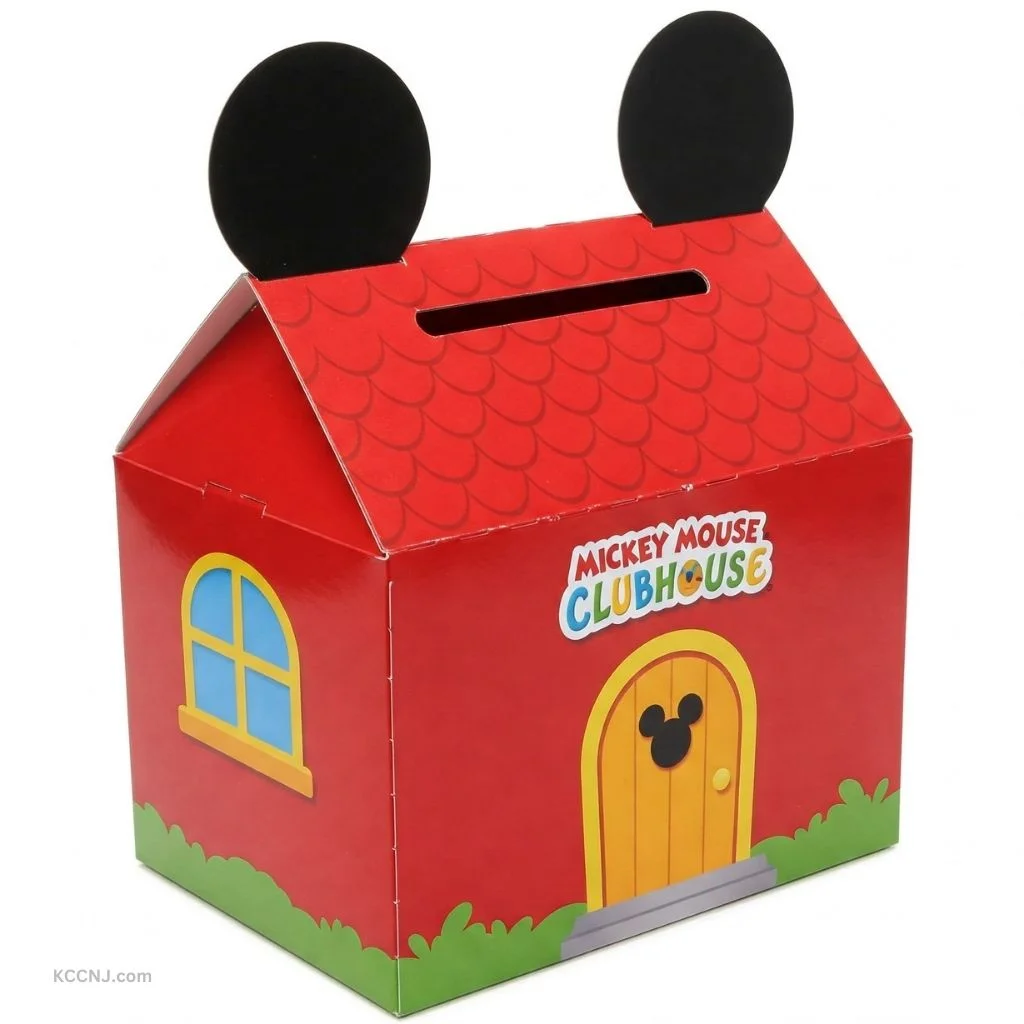
Transform a simple box into a miniature Mickey Mouse Clubhouse for a more elaborate Valentine’s Day card collector.
Materials Required
- Large cardboard box
- Various colors of paint (red, yellow, white, black)
- Craft knife
- Paintbrushes
- Hot glue gun
- Colored paper or foam sheets
- Markers
Construction Steps
- Paint the entire box red as the base color for the clubhouse.
- Cut out windows and a door shape on one side of the box.
- Paint the roof area black to represent Mickey’s ears.
- Add yellow details around the windows and door.
- Create a Mickey Mouse-shaped entrance using black and white paint or paper.
- Cut a slot at the top of the box for card insertion.
- Decorate with additional Mickey Mouse elements like his gloves or shoes using colored paper or foam sheets.
- Add “Mickey Mouse Clubhouse” lettering to the front of the box.
This design not only serves as a Valentine’s card collector but also as a fun play structure after the holiday.
Mickey Mouse Silhouette Box
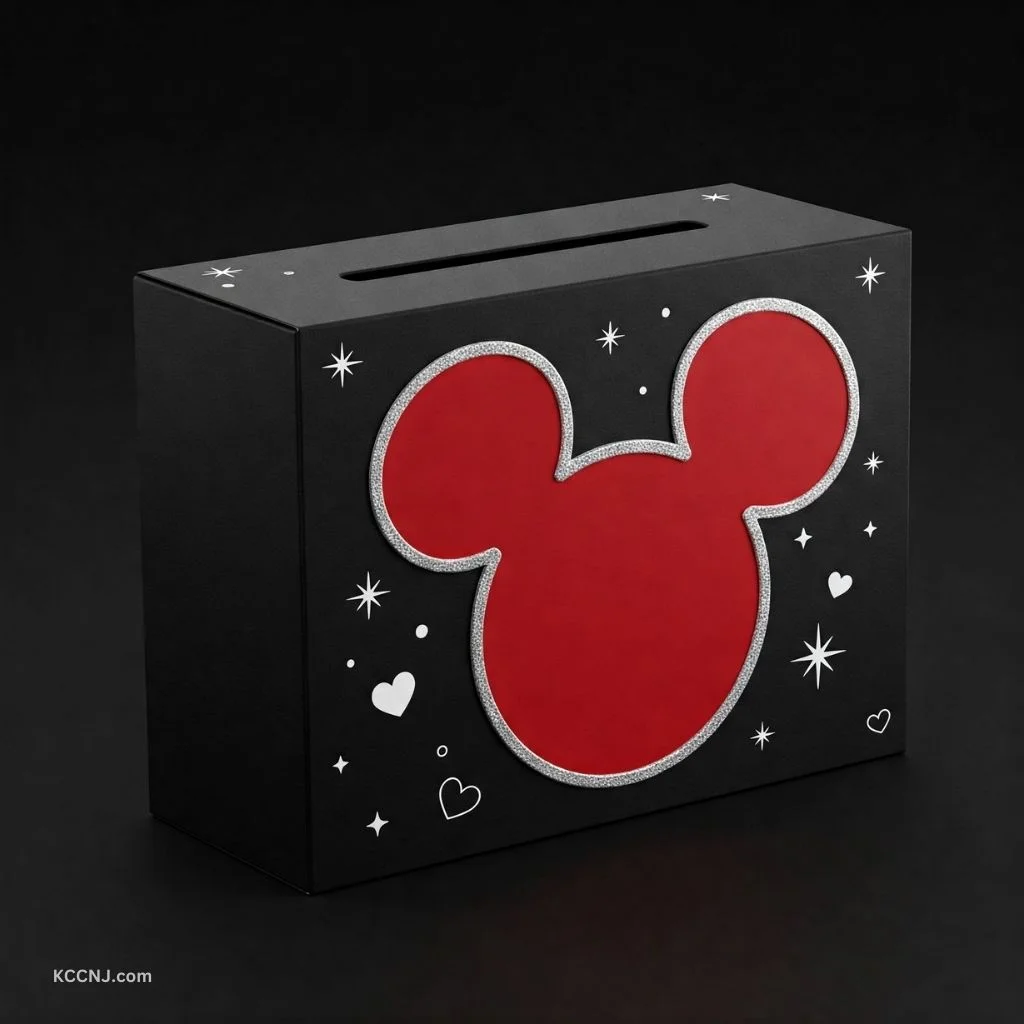
For a more sophisticated look, consider creating a Mickey Mouse silhouette box that’s both stylish and functional.
What You’ll Need
- Square or rectangular box
- Black paint or black paper
- Red paper or paint
- White paper
- Scissors or craft knife
- Glue or tape
- Silver or gold marker (optional)
Creating the Silhouette
- If using paint, cover the entire box in black. If using paper, wrap the box in black paper.
- Cut out a large Mickey Mouse head silhouette from red paper, including the iconic ears.
- Affix the red silhouette to the front of the box.
- Cut a horizontal slot in the top of the box for cards.
- Add white hearts or stars around the silhouette for a festive touch.
- Optional: Use a silver or gold marker to add a border around the silhouette for extra pop.
This design offers a more mature look while still capturing the essence of Mickey Mouse, making it suitable for older children or Disney-loving adults.
3D Mickey Mouse Head Box
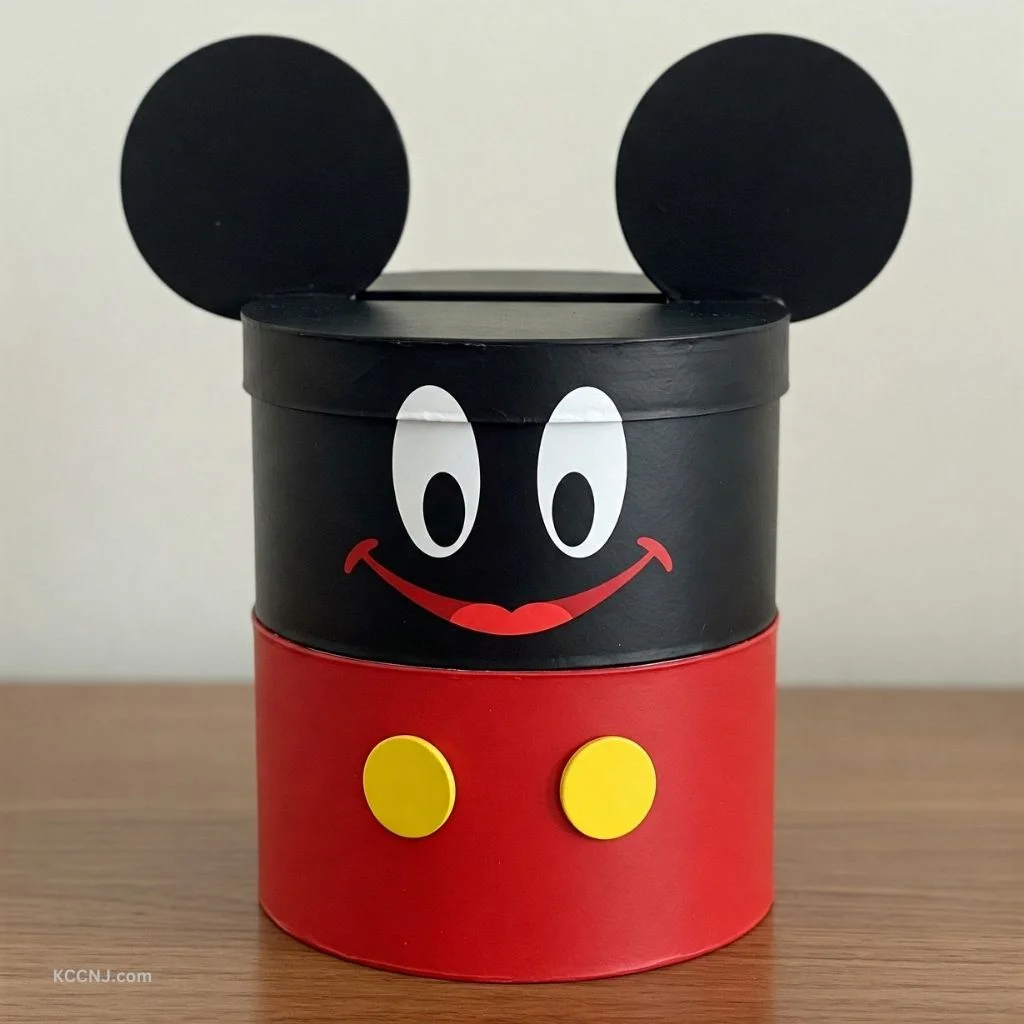
Create a three-dimensional Mickey Mouse head to serve as an eye-catching Valentine’s box.
Materials List
- Two round boxes of different sizes (for head and snout)
- Black spray paint
- Red paint
- White paper
- Yellow craft foam or paper
- Hot glue gun
- Scissors
Assembly Instructions
- Spray paint both boxes black and allow them to dry completely.
- Attach the smaller box to the larger one using hot glue to create Mickey’s snout.
- Cut two large circles from black cardboard for Mickey’s ears and attach them to the top of the larger box.
- Paint Mickey’s signature smile on the smaller box with red paint.
- Cut two large white circles for eyes and attach them to the larger box.
- Add black pupils to the eyes.
- Cut a slot in the top of the head for card insertion.
- Create small yellow buttons from craft foam or paper and attach them to the front of the larger box.
This 3D design creates a standout Valentine’s box that doubles as a decorative piece.
Mickey Mouse Treat Dispenser Box
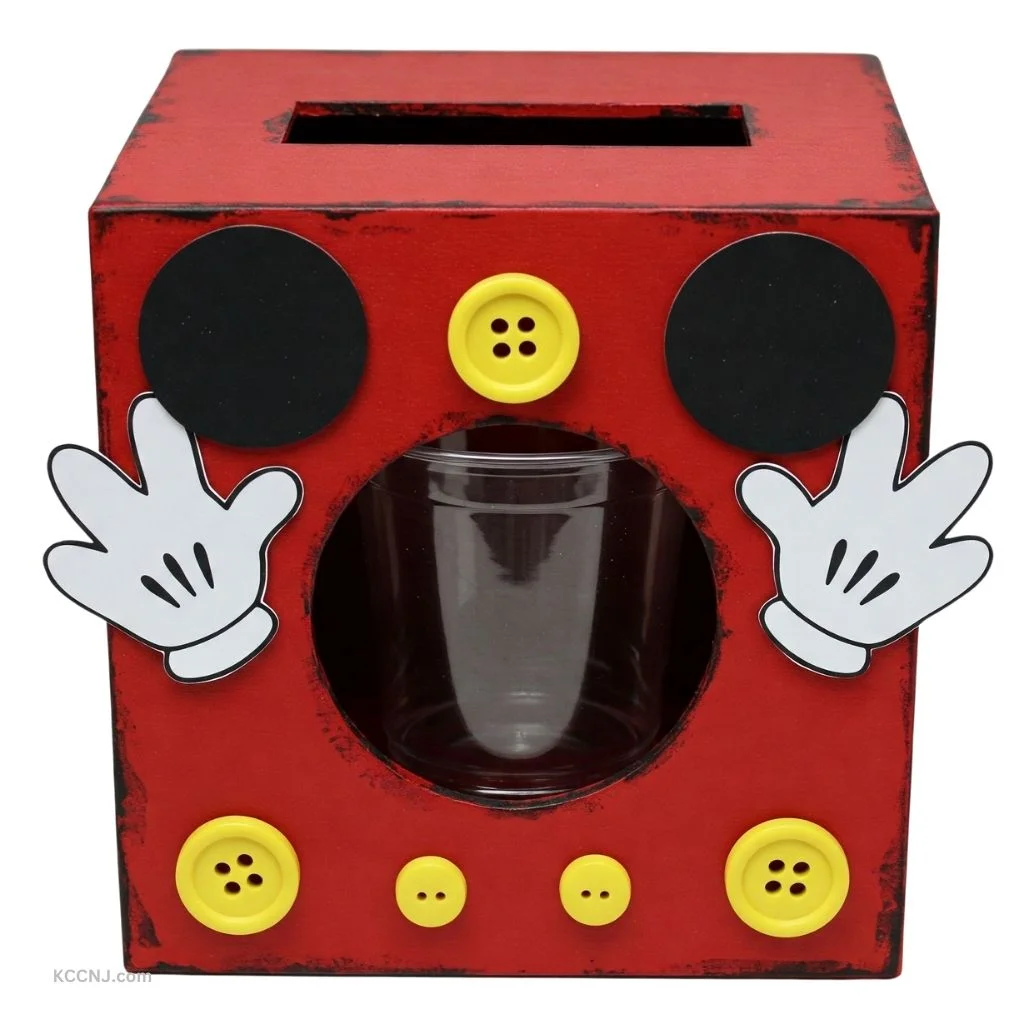
For a fun interactive element, create a Mickey Mouse-themed treat dispenser box.
Necessary Items
- Rectangular box
- Red and black paint
- White paper
- Yellow craft foam or paper
- Clear plastic cup
- Craft knife
- Hot glue gun
- Decorative tape or ribbon
Construction Process
- Paint the box red and black to mimic Mickey’s outfit.
- Cut a circular hole in the front of the box, slightly smaller than the diameter of the plastic cup.
- Insert the plastic cup into the hole and secure it with hot glue.
- Decorate the front of the box with Mickey’s buttons using yellow craft foam or paper.
- Add Mickey’s gloves on either side of the cup using white paper.
- Cut a slot in the top of the box for Valentine’s cards.
- Use decorative tape or ribbon to add finishing touches.
This box not only collects cards but also dispenses small treats or candies through the cup, adding an element of surprise and fun.
Mickey Mouse Tsum Tsum Inspired Box
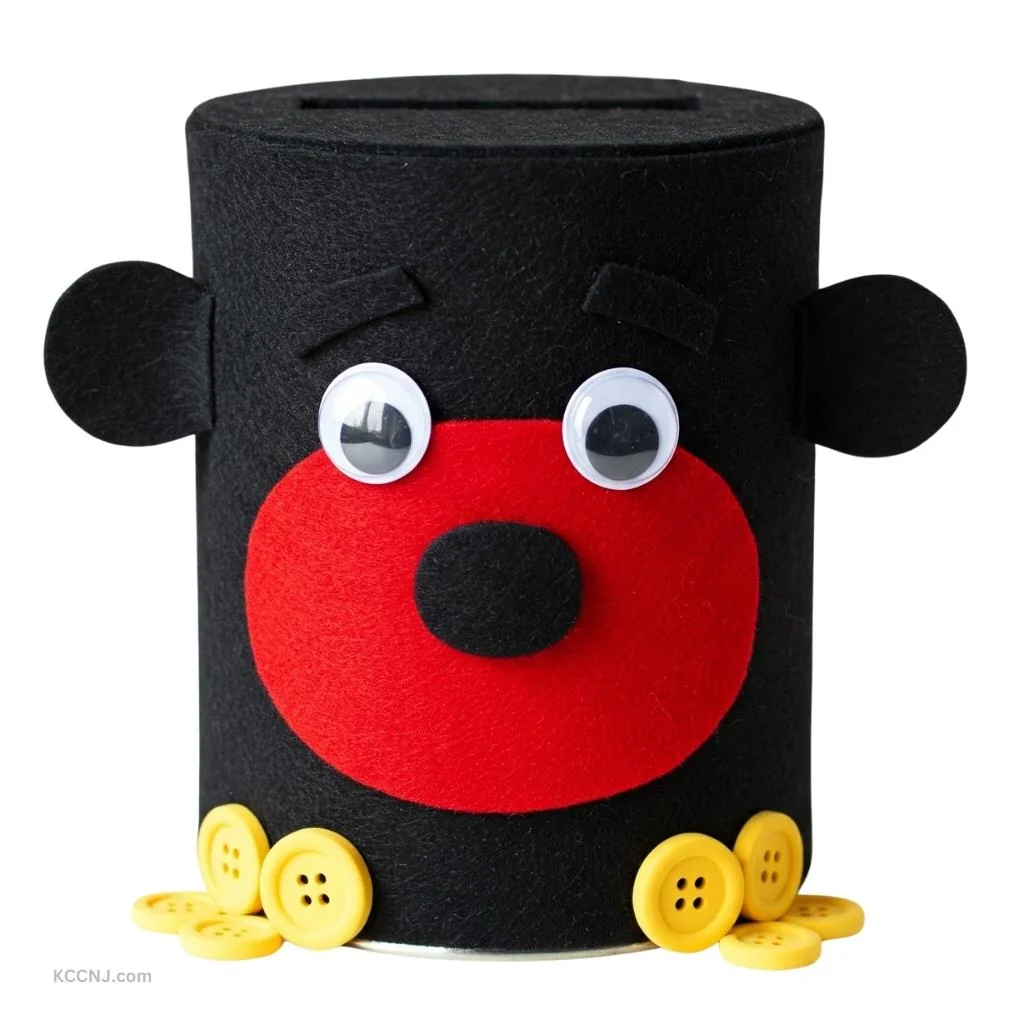
Incorporate the popular Tsum Tsum style into your Mickey Mouse Valentine’s box for a cute, stackable look.
Materials Needed
- Cylindrical container (like an oatmeal canister)
- Black and red felt or fabric
- White felt or paper
- Yellow craft foam
- Googly eyes
- Hot glue gun
- Scissors
- Elastic band (optional)
Creating Your Tsum Tsum Mickey
- Cover the cylindrical container with black felt or fabric, leaving the top open.
- Cut a large oval from red felt for Mickey’s face and glue it to the front of the container.
- Add googly eyes or create eyes using white felt and black paper.
- Cut Mickey’s nose and mouth from black felt and attach them.
- Create ears from black felt and attach them to the top of the container.
- Add yellow buttons to the bottom of the red oval.
- Cut a slot in the top of the container for cards.
- Optional: Add an elastic band around the container to mimic the Tsum Tsum style.
This design combines the beloved Mickey Mouse with the popular Tsum Tsum aesthetic, creating a unique and adorable Valentine’s box.
Mickey Mouse Vintage Postbox
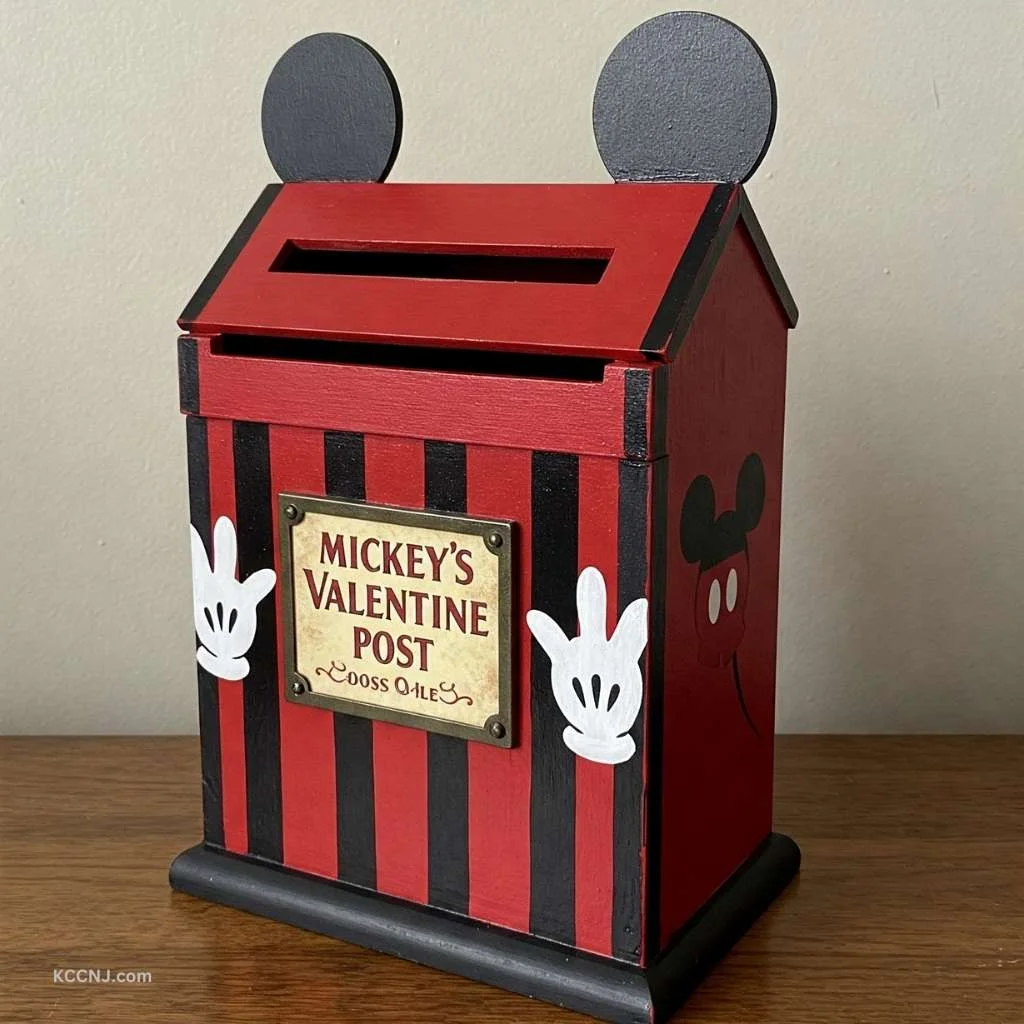
Create a vintage-inspired Mickey Mouse postbox for a touch of nostalgia.
Required Materials
- Rectangular box
- Red and black paint
- Gold paint or marker
- White paper
- Black marker
- Craft knife
- Paintbrushes
Crafting Steps
- Paint the entire box red.
- Once dry, paint black stripes on the lower third of the box.
- Use gold paint or a marker to add decorative elements like borders or Mickey silhouettes.
- Cut a slot in the top of the box for cards.
- Create a vintage-style label with “Mickey’s Valentine Post” and attach it to the front.
- Add Mickey’s ears to the top corners of the box using black paint or paper.
- Draw or paint small Mickey gloves on the sides of the box.
This design combines the classic look of a vintage postbox with Mickey Mouse elements, creating a unique and charming Valentine’s card collector.
Mickey Mouse Comic Book Box
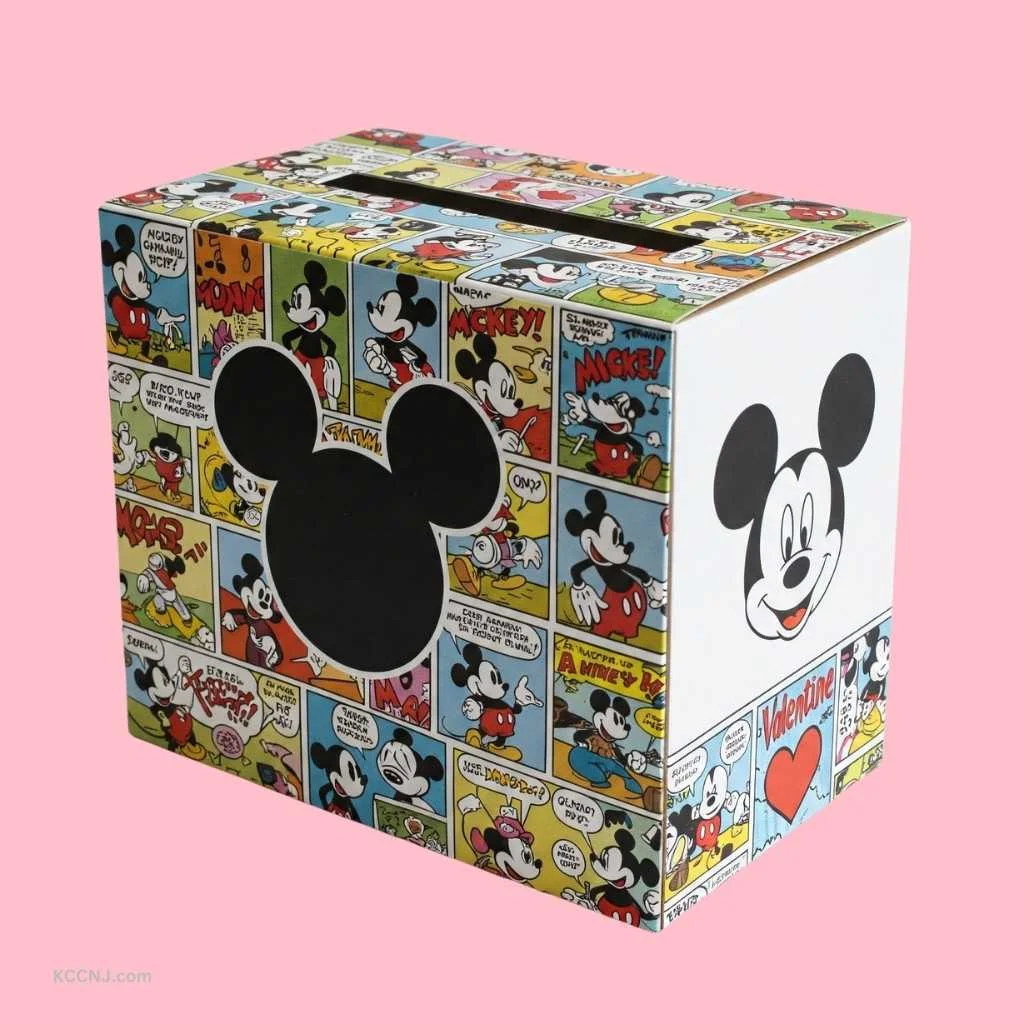
For comic book fans, create a Mickey Mouse Valentine’s box inspired by classic Disney comics.
Materials List
- Rectangular box
- White paper or paint
- Red, black, and yellow markers or paint
- Comic book pages featuring Mickey Mouse (or printouts)
- Mod Podge or clear glue
- Paintbrush
- Scissors
- Black marker
Assembly Instructions
- Cover the box in white paper or paint it white.
- Cut out comic book panels featuring Mickey Mouse and arrange them on the box.
- Use Mod Podge to adhere the comic panels to the box and seal them.
- Draw or paint a large Mickey Mouse head on one side of the box.
- Add speech bubbles with Valentine’s Day messages using markers.
- Cut a slot in the top of the box for cards.
- Use a black marker to add comic-style outlines and details.
This box combines the charm of vintage Mickey Mouse comics with a functional Valentine’s Day card collector, appealing to both Disney and comic book enthusiasts.
Mickey Mouse Steamboat Willie Box
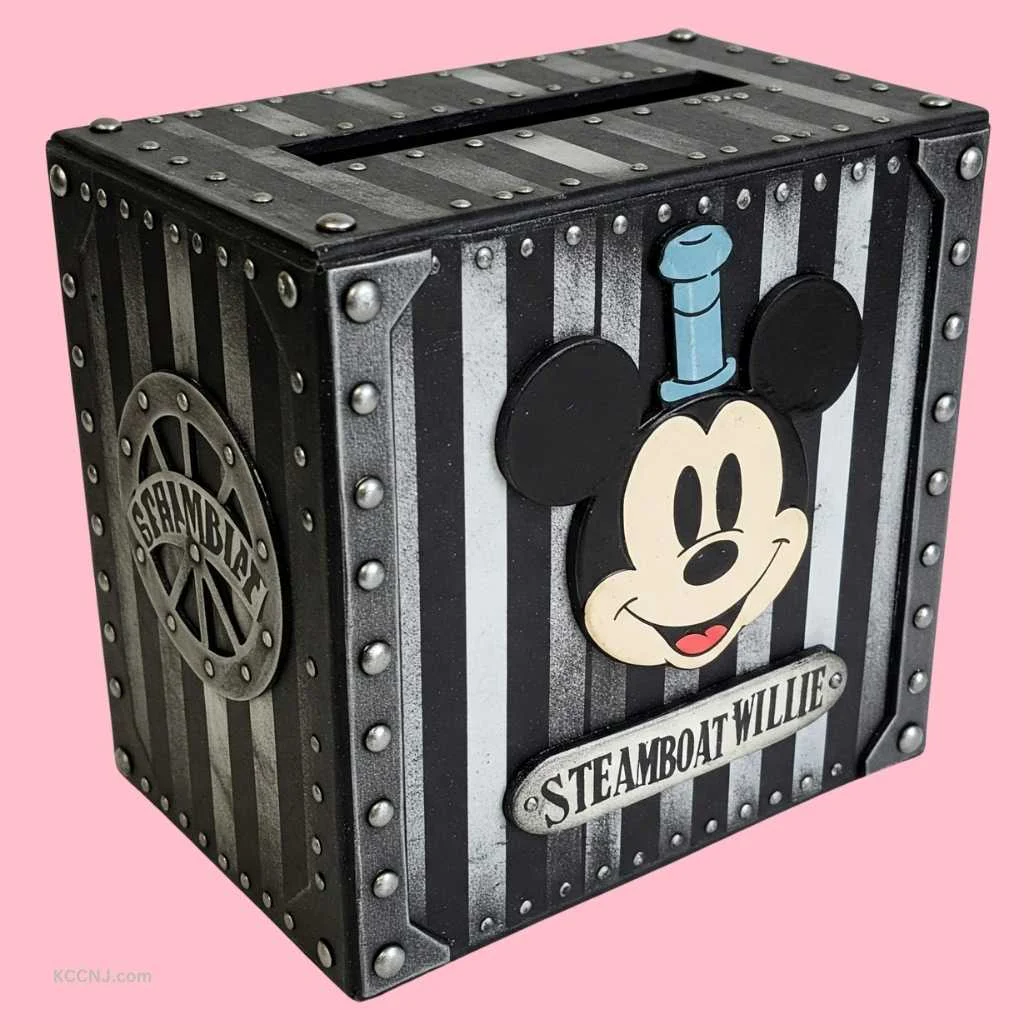
Pay homage to Mickey’s origins with a Steamboat Willie-inspired Valentine’s box.
Needed Supplies
- Rectangular box
- Black, white, and gray paint
- White paper
- Black marker
- Silver or metallic paint
- Craft knife
- Paintbrushes
Creation Process
- Paint the entire box black.
- Once dry, paint vertical stripes in white and gray to mimic the look of old film.
- Cut out a large circle from white paper and paint Mickey’s face in the classic Steamboat Willie style.
- Attach the face to the front of the box.
- Use silver or metallic paint to add details like rivets or a steamboat wheel.
- Cut a slot in the top of the box for cards.
- Add “Steamboat Willie” in a vintage font to the side of the box.
This design celebrates Mickey’s first appearance while serving as a unique Valentine’s Day card collector.
Mickey Mouse Boombox Box
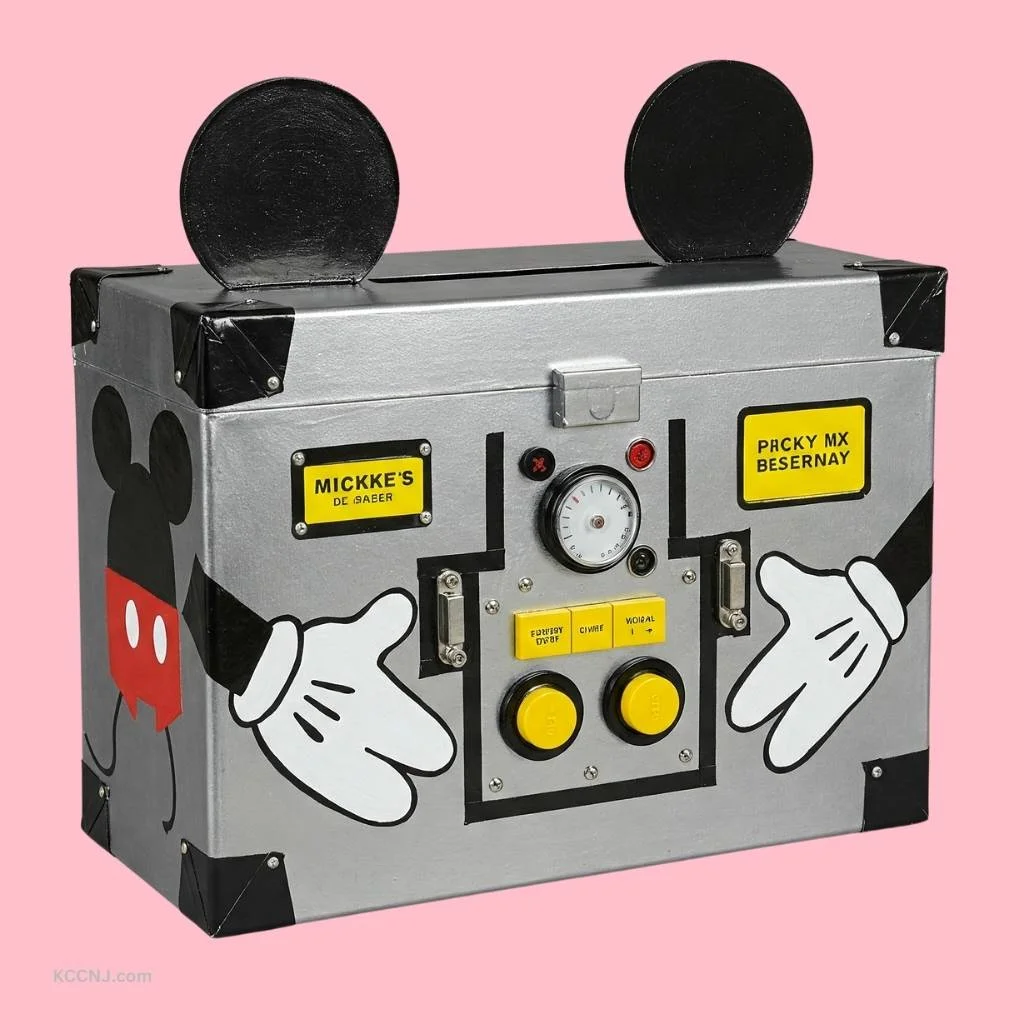
For a fun, retro twist, create a Mickey Mouse-themed boombox Valentine’s box.
Materials Required
- Large rectangular box
- Silver spray paint
- Black and red paint
- Yellow craft foam or paper
- Black electrical tape
- Craft knife
- Hot glue gun
Building Your Boombox
- Spray paint the entire box silver and let it dry completely.
- Use black paint to create speaker circles on the front of the box.
- Paint Mickey’s ears on the top corners of the box.
- Create buttons and dials using yellow craft foam or paper and attach them to the front.
- Use black electrical tape to create details like edges and panel lines.
- Cut a slot in the top center of the box for cards, resembling a cassette slot.
- Add Mickey’s gloves on the sides using white paper and black paint.
This design combines the nostalgia of a retro boombox with Mickey Mouse elements, creating a unique and eye-catching Valentine’s box.
Mickey Mouse Carnival Game Box
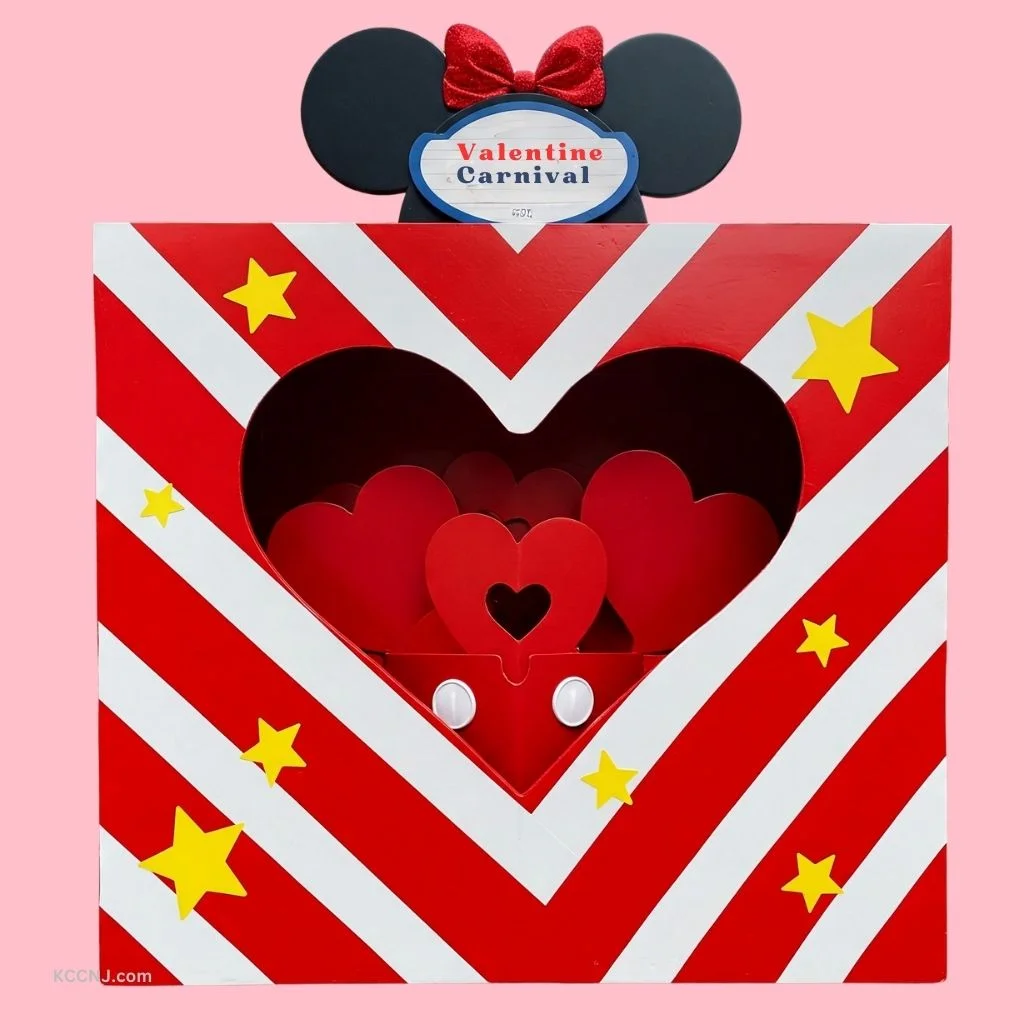
Transform your Valentine’s box into a Mickey Mouse-themed carnival game for an interactive and fun design.
What You’ll Need
- Large cardboard box
- Red, white, and yellow paint
- Black marker or paint
- Craft knife
- Paintbrushes
- String lights (optional)
- Small prizes or candy
Creating Your Carnival Game
- Cut a large heart-shaped opening in the front of the box.
- Paint the box red and add white stripes to create a carnival tent look.
- Paint Mickey’s ears on the top of the box.
- Create a sign that says “Mickey’s Valentine Carnival” and attach it to the top.
- Use yellow paint to add stars or other carnival decorations.
- Cut smaller heart-shaped openings inside the large heart.
- Optional: Add string lights around the openings for a festive touch.
- Place small prizes or candy behind each opening.
This interactive box allows classmates to “play” the carnival game when delivering their valentines, adding an extra element of fun to the card exchange.
19 Minecraft Valentine Box Ideas
Frequently Asked Questions
How can I make a Mickey Mouse Valentine’s box waterproof?
To make your Mickey Mouse Valentine’s box waterproof, consider using a plastic container as the base instead of cardboard. If you prefer to use cardboard, you can coat the finished box with a clear, waterproof sealant spray. Be sure to test the spray on a small area first to ensure it doesn’t affect the paint or decorations.
What are some eco-friendly alternatives for creating a Mickey Mouse Valentine’s box?
For an eco-friendly Mickey Mouse Valentine’s box, use recycled materials like old cereal boxes or shipping boxes as your base. Instead of buying new craft supplies, repurpose items from around your home, such as old fabric for covering the box, buttons for decorations, and newspaper or magazine clippings for collage elements. Use non-toxic, water-based paints and natural glues when possible.
How can I adapt these Mickey Mouse Valentine’s box ideas for older kids or adults?
For older kids or adults, focus on more sophisticated designs like the Mickey Mouse Silhouette Box or the Vintage Postbox idea. Use a minimalist approach with clean lines and a limited color palette. Consider incorporating elements from classic Mickey Mouse art or modern interpretations of the character. You could also create a Mickey-inspired box that doubles as a decorative item or storage solution beyond Valentine’s Day.
Are there any Mickey Mouse Valentine’s box ideas that are particularly suitable for children with sensory sensitivities?
For children with sensory sensitivities, consider creating a Mickey Mouse Valentine’s box with smooth textures and minimal embellishments. The Mickey Mouse Silhouette Box or the 3D Mickey Mouse Head Box can be good options as they have simple, clean designs. Avoid using materials with strong odors or textures that might be uncomfortable. You can also involve the child in the creation process, allowing them to choose materials and designs that feel comfortable to them.
How can I incorporate other Disney characters into a Mickey Mouse Valentine’s box?
To incorporate other Disney characters, you could create a “Disney Friends” themed box with Mickey as the centerpiece. Add small elements representing other characters, such as Minnie’s bow, Donald’s sailor hat, or Goofy’s hat. Another idea is to create a Mickey Mouse Clubhouse box and include images or cutouts of Mickey’s friends around the exterior. You could also design a box that looks like Mickey on one side and transforms into another character on the opposite side.